Body Assembly
The parts in this kit still have flash from the resin casting process which can be removed with a craft knife and fine emery paper.
Two part epoxy resin (such as Araldite) and / or Superglue are recommended to complete the kit.
Begin by drilling out the bogie mounting holes in the floor /chassis to accept the 10 BA bolts and counter-sink before fitting.
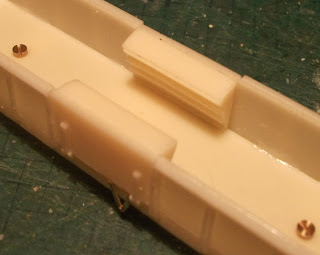
Glue the centre door casting in place in the middle of the side pieces. DO NOT remove the thin flash, glue the door ON TOP. The standard wagon has the two part door with the indentation in the middle, the WHR Bike Wagon has the plain casting with hinges.
If you intend to complete you r model with the handrails along the bottom of the frame and in the top right of each side we would recommend drilling out the holes marked on the castings with a 0.5mm drill at this point in construction.
Glue the two end pieces in place with the bottom edge flush with the bottom of the chassis. When they have glued solid then fix the side pieces in position. Having the ends in place first will assist you in making sure the sides are placed centrally. The two thick horizontal bars on the ends should sit flush with the end of the side pieces.
Fix the 2 inside door detail casts in place on the flat back of the wagon sides. For the standard centre door version the aim is to line up the bulges on the inside with the depressions on the outside.
If you are making a model of the WHR bike wagon conversion place the wedge-shaped cast with the thick edge at the top.
Brake Gear Assembly
Start by gluing the larger of the V brackets in position between just to the left of the right hand centre door hinge (See Fig. 1) on the side of the wagon with the upright brake cylinder .
Insert a short length of 0.5mm wire (not supplied) through the hole and thread on the double-ended link piece, followed by the angled arm and finally the smaller of the V brackets.
The bottom of the arm and bracket should be located within the raised marks on the underside of the chassis. (Fig. 2)
Drill a hole in the centre of the brake cylinder and insert a short length of wire with a 90 degree bend to fit into the hole in the link piece. Apply glue to secure the brake gear pieces and trim wire.
Finally fit a length of wire from the hole in the bottom of the arm to a point around 10mm short of the bogie pivot Glue (or solder) 0.5mm wire through the centre of the hexagonal brake wheels which locate at the left side of the main frame on the wagon ends. (There is a small mark in the castings to show where)
Bogie Assembly
The fold-up bogie etches included on the fret are designed to be completed with 2mm flanged pinpoint bearings and 6.2mm disc wheels which can be obtained from Parkside Dundas. (Code PW22 for the bearings)
We recommend soldering or gluing the bearings into position before the bogie is folded.
Do not fit the bearings flush with the back of the bogie etch but leave them raised a fraction which will hold the wheelsets more securely.
Included in the pack are castings for suspension and axlebox details which can be glued onto the bogies.
Before cutting out each cast bogie frame clear the holes for the axle bushes with a round file. They may need to be enlarged slightly to slip easily onto the brass bearings.
Doing this while there is still excess casting flash around the bogie frame reduces the chances of damaging them during this operation.
A good tip is to grip each axle box casting in the jaws of tweezers of small pliers while enlarging the holes. If part of a casting does break off they can usually be glued back together easily with superglue.
When the casting is prepared glue it in place on the side of the bogie.
If you have any further queries about assembly of this kit please email us at: bostonlargsworks@btinternet.com


I have just completed the assembly on my dz wagon and was wondering what is the best paint match for them? Some kind of red oxide?
ReplyDeleteMany apologies, Keith, I have only just seen your comment. I use red oxide primer spray which you can pick up from any car part store such as Halfords. It is quite vulnerable to chips so I would also then give the model a coat of spray vanish - I use Humbrol enamel satin or matt spray.
Delete